Optimising table display for web and app

Should you use a table?

Tables are good for summarising simple data or comparing categories, but there are often situations where an alternate format would provide a clearer presentation. Before you create a new table, check for any alternative formats that could be more effective:

  • Tables with 4 or more columns will often be hard to present well on a portrait orientation mobile screen. Avoid large tables where possible.
  • Tables are often the best option for presenting numeric data, but for presenting text other formats can often be better. This is particularly true when each table cell contains several sentences or whole paragraphs of text.
  • When presenting simple data, sometimes a series of headings and bullet points can work better than a table.
  • For tables with more complex data and a lot of text, accordion sections can be used to further break up and categorise the data.

Creating a new table

It is generally better to create a new table using the table tool in RDS rather than copying and pasting from the original source. Copy-pasting often leaves in formatting from the original table which can make it harder to edit in RDS.

If you do paste in a table from another source:

  • Try copying the table into a Word document, then cutting and pasting it into RDS. This is a quick way to remove various types of formatting.
  • View the source code of your table, then use find and replace to remove unwanted formatting.

Formatting table dimensions

For many tables the default RDS settings should be sufficient for the table to display clearly. Otherwise, there are several methods you can use to change a table’s formatting and appearance.

The table settings available on the content toolbar can be found by clicking the table icon, then clicking “Table properties”. You can also edit the currently selected cell only from “Cell > Cell properties” or the currently selected column from “Column > Column properties”.

Screenshot of opening table properties menu

 Screenshot of table properties menu

Table width is one of the most important settings to make a table easy to read – you can change table width from the width box. A width can be expressed as a percentage of the available space or as a flat value in pixels. A number in pixels can be expressed as:

{value}px

where {value} is the number of pixels.

For example:

  • A table width of 50% means the table always takes up 50% of its container’s width.
  • A table width of 500px means the table will always take up 500 pixels of screen width.

Below is an example of a table which is too wide for the content:

  Alpha Beta Gamma
Option 1 4 32 7
Option 2 15 21 8
Option 3 8 44 5
Option 4 34 44 3

Below is the same table with a width setting of 320px added to the whole table:

  Alpha Beta Gamma
Option 1 4 32 7
Option 2 15 21 8
Option 3 8 44 5
Option 4 34 44 3

Dynamic table widths

Formatting tables using only the width property is can effectively optimise tables for one screen width, but it is often not enough to make a table look good on both the web and app version. To optimise for multiple screen sizes, adding a min-width property can be effective.

Min-width will prevent a table from shrinking below the specified size, while still allowing it to expand up to its full width. For example, a table using "width: 100%; min-width: 500px;" would always stay at least 500 pixels wide (enabling scrolling if necessary), but where more space was available, would expand to fill any remaining space in excess of 500 pixels.

To set min-width, go to “Table properties > Advanced”. In the “Style” box, insert a min-width setting after any existing code. This uses the format:

min-width: {value}px;

where {value} is the number of pixels (e.g., min-width= 500px;).

The Table properties: Advanced menu with the "min-width: 400px;" property highlighted

When setting a min-width, you may want to add a note that the table will require scrolling on mobile, to prevent users from missing any important information.

It is also possible to add a min-width setting to a single column. This can be useful when you want to allocate more space to a column when not enough width is allocated automatically – this can occur when tables have an unbalanced amount of text between columns.

To do this, you can apply a min-width to only the top cell of the column – this can be done from “Cell > Cell properties > Advanced”, by typing or pasting a min-width setting into the “Style” box.

Below is an example of a table with a first column that is too thin for the text:

 Column 1 Column 2 Column 3 Column 4
longstringlongstring Lorem ipsum dolor sit amet, consectetur adipiscing elit, sed do eiusmod tempor incididunt ut labore et dolore magna  aliqua. Ut enim ad minim veniam, quis nostrud exercitation ullamco laboris nisi ut aliquip ex ea commodo  consequat. Duis aute irure dolor in reprehenderit in voluptate velit esse cillum dolore eu fugiat nulla pariatur. Excepteur 
veryverylongtext sint occaecat cupidatat non proident, sunt in culpa qui officia deserunt mollit anim id est laborum. Libero primis vel natoque velit phasellus? Vitae non condimentum vitae himenaeos, nostra dignissim efficitur. Congue maecenas  bibendum habitasse. Praesent nascetur est vulputate suspendisse efficitur torquent dis sociosqu. Finibus suscipit phasellus est sed 
lotsoflongwords dui parturient aptent donec. Nec integer auctor adipiscing viverra ante feugiat interdum. Ascelerisque ligula vitae eleifend  litora curae ex dictum. Accumsan montes vivamus semper proin metus mattis nullam. Cras senectus ut conubia tincidunt ad. Venenatis commodo ullamcorper dis maecenas ad. Semper aenean nisi leo viverra nostra. Curae interdum pretium quis aliquet ac ultrices ante. Lobortis dui natoque netus, augue ridiculus elementum vulputate laoreet imperdiet. Eu eu ante lacus aptent est ad posuere vivamus inceptos. Enim fusce cubilia condimentum finibus sit ornare eros. Sapien tincidunt etiam.


Below is the same table, but with "width: 17%; min-width: 80px;" applied to the first cell of column 1 and "width: 30%;" applied to column 4. Note that the combination of width settings allows the first column to display at an appropriate size on both web and app:

Column 1 Column 2 Column 3 Column 4
longstringlongstring Lorem ipsum dolor sit amet, consectetur adipiscing elit, sed do eiusmod tempor incididunt ut labore et dolore magna  aliqua. Ut enim ad minim veniam, quis nostrud exercitation ullamco laboris nisi ut aliquip ex ea commodo  consequat. Duis aute irure dolor in reprehenderit in voluptate velit esse cillum dolore eu fugiat nulla pariatur. Excepteur 
veryverylongtext sint occaecat cupidatat non proident, sunt in culpa qui officia deserunt mollit anim id est laborum. Libero primis vel natoque velit phasellus? Vitae non condimentum vitae himenaeos, nostra dignissim efficitur. Congue maecenas  bibendum habitasse. Praesent nascetur est vulputate suspendisse efficitur torquent dis sociosqu. Finibus suscipit phasellus est sed 
lotsoflongwords dui parturient aptent donec. Nec integer auctor adipiscing viverra ante feugiat interdum. Ascelerisque ligula vitae eleifend  litora curae ex dictum. Accumsan montes vivamus semper proin metus mattis nullam. Cras senectus ut conubia tincidunt ad. Venenatis commodo ullamcorper dis maecenas ad. Semper aenean nisi leo viverra nostra. Curae interdum pretium quis aliquet ac ultrices ante. Lobortis dui natoque netus, augue ridiculus elementum vulputate laoreet imperdiet. Eu eu ante lacus aptent est ad posuere vivamus inceptos. Enim fusce cubilia condimentum finibus sit ornare eros. Sapien tincidunt etiam.


Table design

There are a few other things you can do to change table appearance using the editor – some of the most useful ones are:

  • You can change the padding for each cell in the table, which can sometimes improve readability. Go to “Table properties > General > Cell padding” and type a number in the “Cell padding” box to set the padding value.
  • You can change the table borders and background colour. Both of these options “Table properties > Advanced”.
    • You can also do this from cell properties or row properties to edit a specific section of the table.
    • When changing background colour, make sure to check the colour contrast of the background against the text colour is accessible. There are many free sites online which can be used to check colour contrast compliance with Web Content Accessibility Guidelines.

Example table

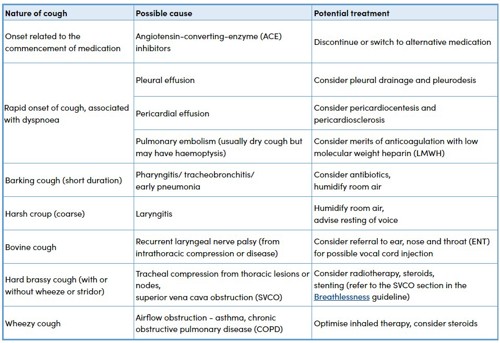
Here is an example of a table that includes border and background styling and uses min-width settings to optimise display on both web and app.

In most browsers you can right click the table then select "Inspect" to view the underlying code.

Nature of cough Possible cause Potential treatment
Onset related to the commencement of medication Angiotensin-converting-enzyme (ACE) inhibitors Discontinue or switch to alternative medication
Rapid onset of cough, associated with dyspnoea Pleural effusion Consider pleural drainage and pleurodesis
Pericardial effusion Consider pericardiocentesis and pericardiosclerosis
Pulmonary embolism (usually dry cough but may have haemoptysis) Consider merits of anticoagulation with low molecular weight heparin (LMWH)
Barking cough (short duration) Pharyngitis/ tracheobronchitis/ early pneumonia Consider antibiotics,
humidify room air
Harsh croup (coarse) Laryngitis Humidify room air,
advise resting of voice
Bovine cough Recurrent laryngeal nerve palsy (from intrathoracic compression or disease) Consider referral to ear, nose and throat (ENT) for possible vocal cord injection
Hard brassy cough (with or without wheeze or stridor) Tracheal compression from thoracic lesions or nodes,
superior vena cava obstruction (SVCO)
Consider radiotherapy, steroids,
stenting (refer to the SVCO section in the Breathlessness guideline)
Wheezy cough Airflow obstruction - asthma, chronic obstructive pulmonary disease (COPD) Optimise inhaled therapy, consider steroids

Screenshot of the table on PC:

Cough table - web display

Screenshot of the table on app:

Cough table - app display:

Additional guidance - using find and replace

  1. Click the edit source code button.

    RDS content edit toolbar with the "Edit source code" icon highlighted

  2. In the source code editor, press Ctrl+f to open the find window.
  3. Click the "+" icon in the bottom left to open the replace section.

    Find tool bar with the "+" icon to open the replace menu highlighted

    Replace with tool bar

  4. Type or copy and paste the text you want to insert into the "Replace with" box. Leave the "Replace with" box blank if you want to delete the searched for text and replace it with nothing.
  5. Click the replace button to replace any found text strings one at a time, or click "All" in the replace row to replace all targets in the section.

    Replace tool bar with the "Replace" and "All" buttons highlighted

When using find in replace to modify a table, it is best to edit the table in a section of source code on its own (e.g., a separate accordion heading) to avoid accidentally replacing text or code. Alternatively, you can restrict the find and replace to a limited area of the code. Do this by selecting an area and clicking the “S” button on the replace toolbar.

Additional guidance - previewing different screen sizes

From the save and preview window, you can preview you can preview what the page would look like with different screen sizes. This can be very useful for checking how tables may look on mobile devices.

In the bottom right of the preview window click "Fit to browser", then select the screen size to preview.

Note that scrolling tables will look different on the web version with mobile screen size than it will look on the app (on the web tables wider than the screen size will go outside the bounds of the screen, on the app they will scroll normally when dragged).