Warning

NHS Borders

Contact Details


Borders General Hospital
Melrose
Roxburghshire
TD6 9BS

Telephone: 01896 827427
Email: orthotics@borders.scot.nhs.uk

"Information given on this site is not meant to take the place of a talk with your doctor or health worker."

Summary Points to remember

Summary points to remember:

  • the collar is used to support neck bones and ligaments and prevent further injury to the neck

  • the collar should remain on at all times – unless instructed otherwise by your doctor

  • two people are required to help change the collar pads

What is a Miami J Collar?

The Miami J collar is a two piece collar. It has a front piece and a back piece, with  interchangeable soft blue pads. When the collar is in place, it is held together by Velcro straps that are fixed from the back piece of the collar to the front. The collar is used to support neck bones and ligaments and reduce any movement that may cause further  damage to the cervical spine/neck injury sustained.

When do I wear the collar?

The collar must be worn at all times, including in the shower, at rest and when sleeping, unless otherwise specified by the doctor/medical team.

Daily Activities

Driving:

It is strongly advised that you do not drive whilst wearing a Miami J collar as it is extremely dangerous. The Miami J collar, combined with neck stiffness and injury, restricts movement of the neck and reduces scope of vision, making driving unsafe. You are not covered by any insurance company to drive whilst wearing a neck collar.

Sleeping:

It is recommended that you sleep on your back using one supportive pillow. The aim is for your head to be supported without pushing your chin forward onto your chest. If the back of your head becomes uncomfortable or there are any rubs on the skin please contact Orthotics or the nurse seeing you for collar care.

Walking:

The collar will restrict your ability to move freely and see your feet. Take care when walking and when going down the stairs, use the handrail if possible. Remove things that may cause you to fall, such as rugs and electrical cords. Use non slip bath mats, grab rails and a shower chair in your bathroom if you feel necessary.

Showering:

You will be sent home with one collar and an extra set of liners. Wear the collar in the shower then dry your neck and change the liners as per the instructions below.

If you have facial hair it can be more comfortable to be clean shaven when wearing a collar. For shaving again follow the procedure below when the collar is off.

Changing the Collar Pads Lying (for carers)

Collar Care requires two people to complete.

Starting Position

The Patient should be lying down in a straight line, on a flat bed and should be reminded to stay still whilst collar care is performed.

One person should hold the patients head still whilst the other performs collar care.

The person holding the patients head should remain in place until the collar is refitted

There should be sufficient space to stand and hold the patients head without obstruction (any headboards should be removed)


 Step 1

 With the head being held, undo the Velcro straps 


  Step 2

  Remove the front part of the collar


Step 3

With the collar off, the skin underneath can be washed with mild soapy water and  dried


Step 4

Ensure the skin is checked for any red or sore areas. If there are any sore areas apply appropriate pressure relieving dressings


    Step 5

    Remove the back panel by pushing the back of the collar into the bed to prevent the patient’s head from moving with it
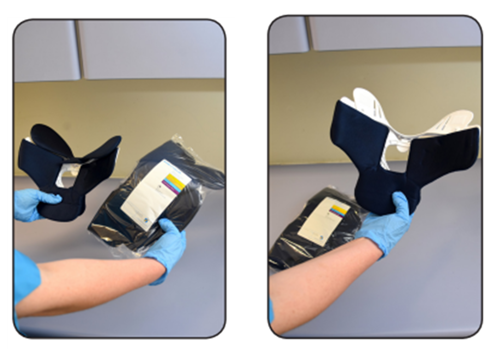


     Step 6

     With the collar off, the pads can be removed and replaced with clean, dry ones (supplied) 

     Ensure the correct size replacement pads are used (only the Stout and XS sizes have specialised pads, the size is written on the front       left side of the collar)


     Step 7

    With the grey side of the pads facing out (pale blue side  towards patient’s skin) apply the pads and ensure there are no edges of the          plastic collar frame exposed


    Step 8

    Ensure the angulation buttons are locked to ensure the collar does not move when in position. In the locked position the “arrow” is 
    horizontal to the adjustment hole

Step 9

When the collar is refitted the head should still be being held securely. Push down into the mattress and push the back of the Collar through


Step 10

Once under the neck ensure the straps are symmetrical so it is positioned centrally


Step 11

To apply the front piece of the collar “flare” the sides of the front out and slide it up the chest wall and “Scoop” it under the chin


Step 12

Angle the sides of the collar up towards the ears. This prevents skin trapping on top of the shoulders and allows the collar to wrap closely around the neck.


 Step 13

 Holding the front securely curl the ends of the collar snugly     against the patient’s neck and apply the Velcro straps. The   back should overlap on top of the front piece.


Step 14

Once the Velcro straps are applied check the collar to ensure it fits snuggly


 Step 15

 If readjustment is needed hold the plastic front piece as shown and   undo the Velcro strap. Using your thumb, move the front piece and
 push the collar up towards their ear until you are happy with the fit.   Ensure the head is still held firmly


 Step 16

 Ensure the straps are lined up correctly (Velcro on Velcro)


Step 17

Before releasing the head hold, ensure the collar is symmetrical,    snug fitting and all the edges of the white hard collar are covered with the grey/blue pads to ensure it doesn’t rub the skin

Editorial Information

Last reviewed: 09/12/2024

Next review date: 31/12/2027

Author(s): MacKay M.

Version: V1

Approved By: Clinical Governance & Quality

Reviewer name(s): MacKay M.