Level of competence
This procedure may only be performed unsupervised by medical and or nurse practitioner level following appropriate training and certification. It is advised to have an assistant of band 2 or above level to ensure asceptic technique is maintained, assistance with decanting the samples and patient comfort.
Equipment
- Bone marrow needles aspirate and trephine
- 5, 10 and 20mls sterile syringes (non leur lock)
- 19G, 21G and 25G sterile needles
- Cleansing solution (Unisept)
- 10mls of 2% lidocaine solution
- Sterile gloves
- Sterile dressing pack
- Skin plaster
- Clean glass slides
- Selection of sample tubes/trephine
- Lumbar puncture needle (22GA)
Samples
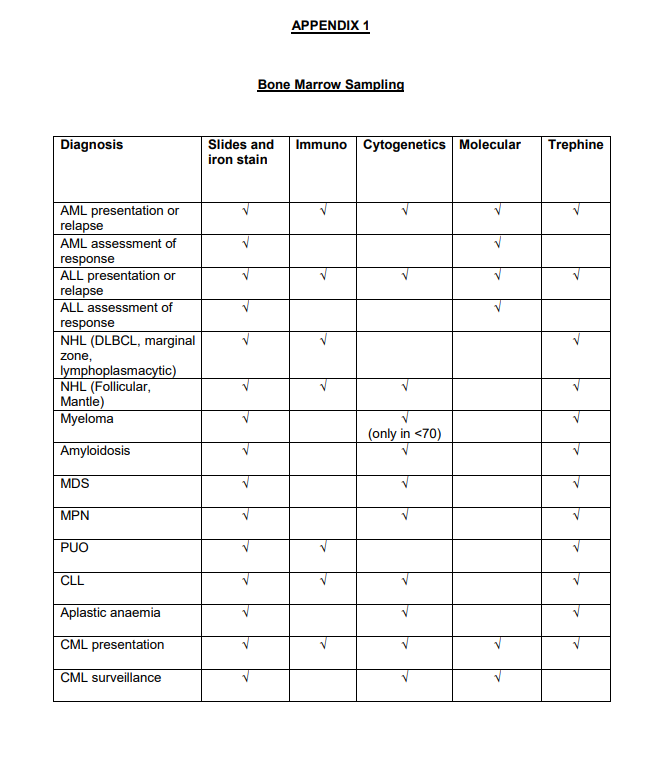
Consult referral and diagnostic sample (Appendix 1) table to determine which particular samples are required for which diagnoses.
- Aspirate-small EDTA-for iron stain and slides (locally)
- Immunophenotyping and or molecular analysis-small EDTA (Edinburgh)
- Cytogenetics-special tube (Edinburgh)
- Trephine-histology pot (Edinburgh)
Pre-Procedure
- Check the most recent bloods. If platelets <20 will require platelet transfusion prior to procedure.
- If on warfarin, ensure patient has been off their medication as per haematologist's instructions.
- If on apixaban, ensure has not take this for at least 24 hours and as per instructions from haematologist.
- Check any allergies.
Procedure
- Explain the procedure, side effects, risks and aftercare to the patient and obtain written consent using the bone marrow consent form.
- Ask the patient to lie on their side, conventionally in the left lateral position (unless there is a reason to take the sample from the opposite side e.g due to prior right hip radiotherapy). Ask the patient to bend their legs up to their chest.
- Expose the area form the lower back to the upper thigh, using a blanket to cover.
- Confirm the posterior iliac crest by resting fingers of hand on the iliac rim and firstly identify anterior iliac crest with fingers and the posterior iliac crest using thumb.
- Open dressing pack onto trolley and using a non touch technique drop the sterile gloves, needles, syringes, aspirate and trephine needles in the sterile area. Dispense the cleansing solution into the enclosed plastic dish.
- Wash hands and dry at the sink.
- Don sterile gloves.
- Disinfect skin using the sterile swab soaked in the cleansing solution.
- Draw up 10mls of lidocaine 2% with a 21G needle and 10ml syringe.
- Using a 25G needle infiltrate the skin overlying the posterior iliac crest.
- Change to a 21G needle and continue to infiltrate down to the level of the periosteum. Then anaesthetise an area of the periosteum approximately 1cm in diameter. Allow 1-2 minutes for the anaesthetic to take effect.
- Take the marrow aspirate needle, remove safety guard and make sure trocar inserted fully.
- Using a gentle rotary movement introduce the needle through the skin down to periosteum, through the cortical bone and into the medullary cavity.
- Remove trocar and attach 5ml syringe.
- Aspirate up to 5mls bone marrow.
- Detach syringe immediately transfer the marrow to the appropriate sample tubes.
- Ask assistant to mix the tubes to prevent clotting.
- If no marrow is aspirable then repeat the aspiration using a 20mls syringe.
- Remove the marrow needle and place a sterile swab over the site
- If proceeding to trephine biopsy assemble trephine needles with trocar in place.
- Use the same skin site entry and area of anaesthetised periosteum but a few millimetres from the aspirate site to take sample.
- Using the same gentle rotatory movement introduce the trephine needle down to the periosteum, through cortical and into the medullary cavity.
- Remove the trocar and using a gentle rotatory movement advance the needle further by 2cm. The needle should be angled slightly upwards, towards the superior anterior iliac crest.
- Gently turn the trephine needle half turns clockwise and anticlockwise.
- Gently withdraw the needle.
- Insert the supplied metal probe in the trephine needles and gently push the biopsy sample out and into the histology pot.
- Place a sterile swab over the skin entry and press firmly for 2 minutes or until there is no noticeable bleeding.
- Place a plaster over the skin.
- Ask the patient to lie supine for 5 minutes following the procedure.
- Check the plaster to ensure no further bleeding prior to allowing home.
Dry Aspirate Procedure
If the attempted aspirate was a dry aspirate perform a trephine roll before placing the trephine biopsy in the histology pot.
- Remove biopsy specimen using probe and place on clean glass slide in such a way that its long axis is parallel to one end of the slide.
- Using a second glass slide roll the trephine biopsy down the length of the first slide.
- Label both slides.
- Allow slides to dry and then take to haematology lab for staining.
Bleeding
If bleeding continues, keep good pressure on site with sterile swabs. Any swelling or haematoma that appears, keep pressure on the site.
Check the patients’ bloods; coag, group and save and FBC. Continue to keep pressure on the site.
Seek advice from haematology consultant in the clinic regarding further care including possible need for infusion of platelets.


